もやもやエンジニア

IT系のネタで思ったことや技術系のネタを備忘録的に綴っていきます。フロント率高め。

Atomがだいたい使える感じになってきたので設定を整理してみる

Atom始めました

  • 仕事だと.Net開発してるので大部分の時間はWindows/VisualStudioを使ってますが、家だとMacBook使うので普通にテキストエディタ使ってます。で、世の中的にはVimEmacsで2分している中、Sublime Text 2でHTMLやらJavaScriptやらNode.jsやらGoやら書いてましたが、ここ最近はAtomに乗り換えてます。だいぶ馴染んだかなと思うので現状を整理。

使ってるPlugin

  • atom-material-ui : UI Themeに設定。Material Designっぽい感じの見た目になる
  • seti-syntax : Syntax Themeに設定。
  • atom-cli-diff : diffツール
  • autocomplete-emojis : 絵文字のAutoCompleteを追加
  • autocomplete-paths : ファイルパスを入力する際のAutoComplete
  • color-picker : カラーピッカーを表示してRGBを入力できたり
  • file-icons : ファイルアイコンが追加される。楽しい。
  • highlight-selected : ファイル内で選択した単語と同じ単語をハイライトする。
  • maximize-panes : 複数Pane開いている場合、ActiveなPaneを全画面表示できるように
  • merge-conflicts : Atom上でgitのconflictをいい感じに編集できる。らしい。ほぼソロ開発なのでまだお世話になってない。
  • regex-railroad-diagram : 正規表現書くとグラフィカルにその表現を図で表示してくれる。
  • project-manager : プロジェクトの管理をしやすくする。色んな場所にプロジェクトがあってもこのパッケージで管理されていれば簡単にたどり着ける
  • tabs-to-spaces : tabをspaceに変換してくれる
  • term2 : Atomのpaneでコンソール開ける
  • ask-stack : Atom上からStackOverFlowに検索をかけて検索結果を見ることができる。
  • language-babel : Babelサポート
  • language-elixir : Elixirサポート
  • react : Reactサポート
  • language-haskell : Haskellサポート。言語系のパッケージは必要になったら探して入れるという感じですな。
  • linter : Lintツール。リアルタイムでチェックしてくれる。下で挙げてるLintたちはこれがないと動かない
  • linter-csslint : CSSのLint
  • linter-jshint : JSのLint
  • 番外:atom-pronama-chan : プロ生ちゃんを背景に召喚できる。デフォだと音声付きなので、自宅以外の場所でうっかり試すと悲劇が起きる。

見た目こんな感じになる

f:id:Rei19:20151012084758p:plain

よく使うショートカット

ショートカット 内容 自分で追加/変更
cmd-, Setting-Viewを開く。パッケージいれたり何か設定するときはここから
ctrl-h, j, k, l, a, e おなじみのカーソル移動
ctrl-alt-h, l 単語レベルで左右に移動
ctrl-tab, ctrl-tab-shift おなじみのタブ移動
ctrl-enter go-to-declaration。選択した関数やら変数の定義元に飛ぶ。要ctags
ctrl-0 PaneとTreeのフォーカスを切り替え
ctrl-w ActiveなPaneを閉じる
ctrl-cmd-s 今開いているプロジェクトを名前をつけて保存する
ctrl-cmd-p 保存済のプロジェクトの一覧を表示して開く
cmd-k + left, right, top, bottom 指定した方向に新しいPaneを開く
cmd-k + cmd-left, right, top, bottom 指定した方向に新しいTerminalを開く
ctrl-] 次のPaneに移動する
ctrl-[ 前のPaneに移動する
ctrl-- Paneのサイズを小さくする
ctrl-; Paneのサイズを大きくする
cmd-n 新しいファイルを作成
cmd-o ファイルを開く
cmd-d カーソルが当たっている単語を選択される。複数個選択することもできる。
cmd-/ 選択中のコードをコメントアウト/コメントアウト解除
cmd-r ファイル内のシンボルの一覧を表示して移動
cmd-f 現在のファイルから検索
cmd-t プロジェクトからファイルを検索して開く
cmd-shift-F 現在のプロジェクトから検索
cmd-shift-enter maximize-panesを呼ぶ。カレントのpaneを最大表示する。その状態からもう一回叩くと元に戻る
cmd-shift-R プロジェクト内のシンボルの一覧を表示して移動
cmd-shift-C カラーピッカーを表示。ピッカーから選択したカラーコードがエディタに反映される
cmd-shift-A ask-stackを呼ぶ
  • 今のところこんな感じで、それなりに快適。

Elixir 入門 ~ META-PROGRAMMING IN ELIXIR ~ その2 - Macro

Macros

Foreword

  • Macroは通常のElixirのコードよりもわかりづらい。開発者は責任を持ってクリーンなコードを書くように心がける。
  • Elixirはすでに簡潔でわかりやすい仕組みを提供している。Macroを使うのは最後の手段であると理解すべきだろう。

Our first macro

  • Macroはdefmacro/2で定義される。macros.exsを作ってみよう。
defmodule Unless do
  def fun_unless(clause, expression) do
    if(!clause, do: expression)
  end

  defmacro macro_unless(clause, expression) do
    quote do
      if(!unquote(clause), do: unquote(expression))
    end
  end
end
  • iex macros.exs で作成したモジュールと使ってiexを開始して、以下のコマンドを投げてみる。
iex> require Unless
nil
iex> Unless.macro_unless true, IO.puts "this should never be printed"
nil
iex> Unless.fun_unless true, IO.puts "this should never be printed"
"this should never be printed"
nil
  • fun_unless!trueの評価にもかかわらず文字列が表示されている。これはunlessが呼ばれる前にすでにIO.puts ~が評価されているためである。もう少し詳しく見てみる。

  • Unless.macro_unless true, IO.puts "this should never be printed"マクロ が呼ばれた時、macro_unless は以下を受け取っている。

  • Unless.macro_unless(true, {{:., [], [{:aliases, [], [:IO]}, :puts]}, [], ["this should never be printed"]})
  • そしてMacroから返される式は以下になる。
{:if, [], [
  {:!, [], [true]},
  {{:., [], [IO, :puts], [], ["this should never be printed"]}}]}
  • Macro.expand_once/2を使って確認してみよう。
iex> expr = quote do: Unless.macro_unless(true, IO.puts "this should never be printed")
iex> res  = Macro.expand_once(expr, __ENV__)
iex> IO.puts Macro.to_string(res)
if(!true) do
  IO.puts("this should never be printed")
end
:ok
  • Macro.expand_once/2quoted expressionを受け取り、現在の環境に合わせて拡張した結果を返す。
  • このようにMacroはquoted expressionを受け取り何かに変換して返す。実のところunless/2, defmacro/2, def/2, defprotocol/2のようなElixirのコンストラクタはすべてマクロである。すなわち、開発者の環境に応じて拡張されている。
  • 我々はどのような関数やMacroもオーバーライドできる。ただし、Kernel.SpecialFormsは例外で、拡張はできない。

Macros hygiene

  • ElixirのMacroは遅延評価(late resolutionはこの訳でいいのか。。。)を持っている。これはquoted expressionの中の変数とMacroが拡張されるときの変数がコンフリクトしないことを保証している。以下の例を見てみる。
defmodule Hygiene do
  defmacro no_interference do
    quote do: a = 1
  end
end

defmodule HygieneTest do
  def go do
    require Hygiene
    a = 13
    Hygiene.no_interference
    a
  end
end
HygieneTest.go
# => 13
  • no_interference/0の中でaに値を束縛しているが、requireしているTestモジュールのaには影響を与えていない。
  • 次のようにするとどうだろうか。
defmodule Hygiene do
  defmacro interference do
    quote do: var!(a) = 1
  end
end

defmodule HygieneTest do
  def go do
    require Hygiene
    a = 13
    Hygiene.interference
    a
  end
end
HygieneTest.go
# => 1
  • Macro内のavar!で囲むとgo/0内のaに値を再束縛している。

The environment

  • Macro.expand_once/2 を使った時に引数に __ENV__ を指定したが、これはなんだろうか。
  • __ENV__ は、現在のモジュールに関する様々な情報が格納された Macro.Env 構造体のインスタンスを返す。
iex> __ENV__.module
nil
iex> __ENV__.file
"iex"
iex> __ENV__.requires
[IEx.Helpers, Kernel, Kernel.Typespec]
iex> require Integer
nil
iex> __ENV__.requires
[IEx.Helpers, Integer, Kernel, Kernel.Typespec]

Private macros

  • ElixirはPrivate Macroもサポートしている。モジュール内がスコープになるMacroだが、注意しなければならないことがある。
  • Macroは使う前に定義されていなければならない。例えば以下のような場合は、Macroを定義する前に使っているのでエラーになる。
iex> defmodule Sample do
...>  def four, do: two + two
...>  defmacrop two, do: 2
...> end
** (CompileError) iex:2: function two/0 undefined

Write macros responsibly

  • Macroは強力で、ElixirはMacroを責任を持って使うための仕組みを提供している。
  • Macros are hygienic
    • Macroの中で定義された変数はユーザーコードに影響されない。
    • さらにMacroの中での関数呼び出しや、aliasはユーザーのコンテキストを汚染しない
  • Macros are lexical
    • Macroはグローバル空間に注入することはできない。Macroはモジュールの中でrequireあるいはimportしないと使えない。
  • Macros are explicit
    • Macroは明示的に実装されていなければ動かすことができない。
    • Macroはコンパイルの間に明示的にもたらされなければならない。
  • Macros’ language is clear
    • 多くの言語はquoteunquoteのためにシンタックスショートカットを提供している。ElixirはMacroの定義やquoted expressionとの境界を明確にするために、別に明示的に書くようにしている。
  • 上記の仕組みを持ったとしても、開発者は大きな責任を負う。もしMacroを使う場合は、MacroはあなたのAPIではないということを覚えておこう。Macroの定義は短く保つべきである。次の例を見てみよう。
defmodule MyModule do
  defmacro my_macro(a, b, c) do
    quote do
      do_this(unquote(a))
      ...
      do_that(unquote(b))
      ...
      and_that(unquote(c))
    end
  end
end
  • これを次のように書き換える
defmodule MyModule do
  defmacro my_macro(a, b, c) do
    quote do
      # Keep what you need to do here to a minimum
      # and move everything else to a function
      do_this_that_and_that(unquote(a), unquote(b), unquote(c))
    end
  end

  def do_this_that_and_that(a, b, c) do
    do_this(a)
    ...
    do_that(b)
    ...
    and_that(c)
  end
end
  • Macro内のコードが明確でテストしやすくなった。テストを書く場合はdo_this_that_and_that/3を直接呼べばよい。

Elixir 入門 ~ META-PROGRAMMING IN ELIXIR ~ その1 - Quote and unquote

Quoting

  • Elixir のプログラムはtupleを伴った3つの要素に置き換えることができる。例えばsum(1, 2, 3)があった場合は以下のように書き換えることができる。
  • 以下、自分の環境だとsumなんかおらん!と言われるのでremとか適当なビルトイン関数に置き換えて試すといいかと。
{:sum, [], [1, 2, 3]}
  • quote マクロを使うと式の構造を見ることができる
iex> quote do: sum(1, 2, 3)
{:sum, [], [1, 2, 3]}
  • 1つ目の要素は関数名のatom、2つ目はメタデータのリスト、3つ目は引数のリストとなる
  • operatorも同様に確認できる。
iex> quote do: 1 + 2
{:+, [context: Elixir, import: Kernel], [1, 2]}
  • mapも同様に確認できる。
iex> quote do: %{1 => 2}
{:%{}, [], [{1, 2}]}
  • 変数も同様
iex> quote do: x
{:x, [], Elixir}
  • Macro.toString/1を使えば式を文字列で取得できる。
iex> Macro.to_string(quote do: sum(1, 2 + 3, 4))
"sum(1, 2 + 3, 4)"

Unquoting

  • Quote で式の構造を見ることができるが、場合によっては展開して欲しくない部分もあるかもしれない。以下の例を見てみる。
iex> number = 13
iex> Macro.to_string(quote do: 11 + number)
"11 + number"
  • numberがそのままstringとして扱われていて、欲しい結果ではない。numberに値を注入するためにはunquoteを使う。
iex> number = 13
iex> Macro.to_string(quote do: 11 + unquote(number))
"11 + 13"
  • さきほどとは異なり、unquoteで囲んだnumberは束縛されている値が表示された。
  • unquoteは関数名にも適用できる。
iex> fun = :hello
iex> Macro.to_string(quote do: unquote(fun)(:world))
"hello(:world)"
  • funhello/1で展開された。
  • Listの中に新しい要素を追加したい場合を考えてみる。
iex> inner = [3, 4, 5]
iex> Macro.to_string(quote do: [1, 2, unquote(inner), 6])
"[1, 2, [3, 4, 5], 6]"
  • これは期待した結果ではない。このような場合は unquote_splicing を使うとよい。
iex> inner = [3, 4, 5]
iex> Macro.to_string(quote do: [1, 2, unquote_splicing(inner), 6])
"[1, 2, 3, 4, 5, 6]"
  • Unquotingはコードの中に別のコードを埋め込むことができ、マクロを書くときにとても便利なので覚えておこう。

Escaping

  • Macro.escape/1を使っても展開できる。
iex> map = %{hello: :world}
iex> Macro.escape(map)
{:%{}, [], [hello: :world]}
  • マクロはquoted expressionsを受け取りquoted expressionsを返す必要がある。大事なのはexpressionvalueを区別することである。integerやatom、stringといったようなvalueはquoted expressionsが自分自身の値だが、mapのような値は変換される必要がある。
  • ちょっと訳が怪しいけど。。。おそらく以下のようにquoteをかけるとquoted expressionsが返るものと自身の値が返るもので違いがあるので気をつけろということかな。
iex> quote do: %{1=> 2}
{:%{}, [], [{1, 2}]}
iex> quote do: :hello
:hello

Elixir 入門 ~ MIX AND OTP ~ その9 - Distributed tasks and configuration

  • 最後にroutingの機能をKVアプリケーションに追加する。routing table はこのようになる。
[{?a..?m, :"foo@computer-name"},
 {?n..?z, :"bar@computer-name"}]

Our first distributed code

  • VMに名前をつけて開始する。iex --sname fooでREPLを起動する。
  • すると以下のように node名@computer-name がpromptに表示される
Interactive Elixir - press Ctrl+C to exit (type h() ENTER for help)
iex(foo@your_hostname)>
  • この中でモジュールを定義する。
iex(foo@your_hostname)> defmodule Hello do
...>  def world, do: IO.puts "hello world"
...> end

iex(foo@your_hostname)> Hello.world
hello world
:ok
  • 次にfooを生かしたまま、別のnode名で新しくREPLを立ち上げて、先ほどのHello.worldを呼ぶ
iex --sname bar
iex(bar@your_hostname)> Hello.world
** (UndefinedFunctionError) undefined function: Hello.world/0 (module Hello is not available)
    Hello.world()
  • 当然、barには定義されていないので返ってこない。ここで Node.spawn_link を使ってfooの新しいプロセスを作ることができる。
iex(bar@your_hostname)> Node.spawn_link :"foo@ your_hostname", fn -> Hello.world end
hello world
#PID<8897.78.0>
  • hello world` が 表示された。他のnodeのプロセスを生んでそのpidを返したことがわかる。次にそのpidを使ってメッセージの送受信をする。
iex(bar@your_hostname)> pid = Node.spawn_link :"foo@your_hostname", fn ->
...>   receive do
...>     {:ping, client} -> send client, :pong
...>   end
...> end
#PID<8897.86.0>
iex(bar@your_hostname)> send pid, {:ping, self}
{:ping, #PID<0.65.0>}
iex(bar@your_hostname)> flush
:pong
:ok
  • foo nodeに :ping を受け取って :pong を返す関数を定義したプロセスを作った。そしてbarから fooに :ping を送って :pong が帰ってきたことがわかる。ただ、このやり方はsupervison tree の管理からは外れるので避けたい。他の方法も探してみよう。

async/await

  • Elixirは async/await パターンも提供している。asyncで先に計算してawaitであとで結果を取り出すというようなことが可能。
iex> task = Task.async(fn ->
...> :timer.sleep(5000)
...> "hogehoge"
...> end)
%Task{pid: #PID<0.82.0>, ref: #Reference<0.0.2.103>}
iex>  Task.await(task)
"hogehoge"
  • Task.supervisorの下で使うことも可能。その場合はTask.Supervisor.start_child/2の代わりにTask.Supervisor.async/2でプロセスを作ってやればよい。結果の取り出しはTask.await/2で可能

Distributed tasks

  • distributeされたtaskはsuperviseされたtaskとほとんど同じで、違いはsupervisortaskを作成するときにnode名を渡しているだけである。lib/kv/supervisor.exを開いてTask Supervisorを追加しよう。
supervisor(Task.Supervisor, [[name: KV.RouterTasks]]),
  • 保存したらKVアプリケーションのルートで iex --sname foo -S mixiex --sname bar -S mix をそれぞれ立ち上げる。
  • 片方からもう片方にnode名を返すタスクを作ってasync/awaitでnode名が返ることを確認する。
iex(bar@your_hostname)> task = Task.Supervisor.async {KV.RouterTasks, :"foo@your_hostname"}, fn ->
...>   {:ok, node()}
...> end
iex(bar@your_hostname)> task = Task.Supervisor.async {KV.RouterTasks, :"foo@your_hostname"}, fn ->
...> (bar@your_hostname)> {:ok, node()}
...> (bar@your_hostname)> end
%Task{pid: #PID<12875.125.0>, ref: #Reference<0.0.7.9>}
iex(bar@your_hostname)> Task.await(task)
{:ok, :"foo@your_hostname"}

Routing layer

  • lib/kv/router.ex を作ってroutingの機能を実装する。
  • 以降のコードのyour_hostnameのあたりはサンプルを動かす実行環境に合わせて修正
defmodule KV.Router do
  @doc """
  Dispatch the given `mod`, `fun`, `args` request
  to the appropriate node based on the `bucket`.
  """
  def route(bucket, mod, fun, args) do
    # Get the first byte of the binary
    first = :binary.first(bucket)

    # Try to find an entry in the table or raise
    entry =
      Enum.find(table, fn {enum, node} ->
        first in enum
      end) || no_entry_error(bucket)

    # If the entry node is the current node
    if elem(entry, 1) == node() do
      apply(mod, fun, args)
    else
      sup = {KV.RouterTasks, elem(entry, 1)}
      Task.Supervisor.async(sup, fn ->
        KV.Router.route(bucket, mod, fun, args)
      end) |> Task.await()
    end
  end

  defp no_entry_error(bucket) do
    raise "could not find entry for #{inspect bucket} in table #{inspect table}"
  end

  @doc """
  The routing table.
  """
  def table do
    # Replace computer-name with your local machine name.
    [{?a..?m, :"foo@your_hostname"},
     {?n..?z, :"bar@your_hostname"}]
  end
end
  • テストもtest/kv/router_test.exs を追加する。
defmodule KV.RouterTest do
  use ExUnit.Case, async: true

  # 対応するnodeがrouterから返ってくるか
  test "route requests across nodes" do
    assert KV.Router.route("hello", Kernel, :node, []) ==
           :"foo@your_hostname"
    assert KV.Router.route("world", Kernel, :node, []) ==
           :"bar@your_hostname"
  end

  test "raises on unknown entries" do
    assert_raise RuntimeError, ~r/could not find entry/, fn ->
      KV.Router.route(<<0>>, Kernel, :node, [])
    end
  end
end
  • 作成したらテストを走らせるために事前に iex --sname bar -S mix で bar node を作成し、その後に elixir --sname foo -S mix test で foo node でテストが実行される。通ればOK。

Test filters and tags

  • テストは通ったが mix testだけでは走ることができない複雑な構造になってしまった。
  • tagを使おう。test/kv/router_test.exsを開いてテストにtagをつけてみる。
# @tag distributed: true と書いても同じ
@tag :distributed
test "route requests across nodes" do
  • 次に test/test_helper.exs を開いて、Nodeが生きている場合のみdistributed tag が付いているテストが実行されるようにする。
exclude =  if Node.alive?, do: [], else: [distributed: true]

ExUnit.start(exclude: exclude)
  • mix testを走らせると、route requests across nodes テストが対象から外れて実行されなくなったはずだ。
  • tagを使ったmix testのオプションとして以下がある。
    • mix test --include tag : include オプションで指定されたtagはテスト対象に含まれる
    • mix test --exclude tag : exclude オプションで指定されたtagはテスト対象から除外される
    • mix test --only tag : only オプションで指定されたtagはそのtagがついたテストのみ実行される
  • 今回のケースでdistributed tagがついたケースだけを実行させたい場合は elixir --sname foo -S mix test --only distributed で実行される。もちろん、この場合はテストで使うnodeが動いていなければテストは通らない。

Application environment and configuration

  • Routing tableKV..Routerモジュールにハードコードしたが、これはうまくない。developとproductionで異なるものを使いたいときもあるだろう。
  • application environmentを使う。apps/kv/mix.exsを開いてapplication/0を次のように書き直す。
def application do
  [applications: [],
   env: [routing_table: []],
   mod: {KV, []}]
end
  • 新たに:env keyを追加した。env:で設定されたkey-valueがapplication environmentのデフォルト値となる。KV.Router.table/0' を書き換えてapplication environmentからRouting table`の設定を読み込むようにする。
@doc """
The routing table.
"""
def table do
  Application.get_env(:kv, :routing_table)
end
  • Application.get_env/2 で指定したapplication environmentの値を取ることができる。次に実際に値を設定する。設定する場所は決まっていてconfig/config.exsに書く。routing_tableの設定を書こう。
# Replace computer-name with your local machine nodes.
config :kv, :routing_table,
       [{?a..?m, :"foo@your_hostname"},
        {?n..?z, :"bar@your_hostname"}]
  • config/config.exsはアプリケーションごとに持っていて共有されない。共有したい場合は他のアプリケーションのconfigimportすることができる。例えばkv_umbrellaconfig.exsと共有したい場合は次のようにimportする。
import_config "../apps/kv/config/config.exs"
  • 実際にはumbrellaオプションをつけて作成したアプリケーションは自動的にapps配下のすべてのconfigをimportするようになっているのでこのコードを書く必要はない。

さいごに

  • 課題っぽいのが与えられているので解いてみる
    • 内部のハードコードされているポートをapplication environmentから取るようにする。
    • kv_serverがローカルのKV.Registryからbucketを作っているところをroutingを使うようにする。テストも直す。
  • 最後はやっつけ仕事になってしまった。。。

とりあえず、今までのコード

elixir_training/kv_umbrella at master · rei-m/elixir_training · GitHub

Elixir 入門 ~ MIX AND OTP ~ 実際にOTPを使ってプロセス管理をする

  • ElixirのGetting StartもMix/OTPが終わり、次に進むのですが、復習がてら前にElixirで書いたコードをMix and OTPの章でやったことを使って改善してみます。
  • 元ネタはQiitaの自分の投稿 ElixirでSlackのbotを作ってHerokuで動かしてみる - Qiita
    • いまいちQiita とはてブの使い分けが明確になってないけど、今のとこ、完全に自分用のメモとかQiitaに上げるまでもないかなと思ったものははてブに書いてます。

やりたいこと

  • とにかくElixirでなんか作ろうと思って書いたのが上の記事ですが、書いていた時に微妙だなーと思ってた点が2つあります。
    1. アプリケーションの起動が微妙。わざわざboot用のファイルを作ってmix run で指定するなんてことはしなくてもできるはず。
    2. Slackからメッセージを受け取り解析してメッセージを送り返すという動作を一つのプロセスで回しているので、botに重いことをさせようとすると、全体が遅れてしまう。プロセスを分離してbotの行動の一つ一つは別プロセスで動かしたい。

改善してみる

  • コードはこちらにあがっています。

rei-m/magic_bot · GitHub

アプリケーションの起動まわり

  • mix.exs を以下のように編集してapplication起動時のモジュールを指定して、Applicationビヘイビアを実装したMagicBotモジュールを作成してそこに起動用のコードを書けば解決。
  def application do
    [applications: [:logger, :slack],
    mod: {MagicBot, []}]
  end
  • これでmix run --no-halt でアプリケーションが起動するようになりました。

Supervision Tree を使ってプロセスを分離する

  • 今、プロセス1本で動いてるところをこういうSupervision Treeに変える。

  • アプリケーションのsupervisor

    • Slackのソケットを張り続けるプロセス
    • Botに実行させたいコマンドを管理するsupervisor
      • 各コマンド。命令を受け取った時点でsupevisor経由で動的に作成される。
  • Slackからメッセージを受け取ったらパースしてsupervisor経由でやりたいことを実行させるという感じですね。

作ってみた

  • まずはアプリケーションの起点となるモジュールで全体を管理するSupervisorを起動

lib/magic_bot.ex

defmodule MagicBot do

  use Application

  def start(_type, _args) do
    MagicBot.Supervisor.start_link
  end

end
  • 次にBotのsupervisor

lib/magic_bot/supervisor.ex

defmodule MagicBot.Supervisor do

  use Supervisor

  def start_link(opts \\ []) do
    Supervisor.start_link(__MODULE__, :ok, opts)
  end

  # Define alias of process name
  @bot_name MagicBot.Bot
  @action_sup_name BotAction.Supervisor

  def init(:ok) do

    # Get API Token of Slack.
    api_key = case System.get_env("MAGICBOT_API_KEY") do
      nil -> Application.get_env(:MagicBot, :api_key)
      s -> s
    end

    # Make child process
    children = [
      supervisor(BotAction.Supervisor, [[name: @action_sup_name]]),
      worker(MagicBot.Bot, [api_key, [name: @bot_name, sup_action: @action_sup_name]])
    ]

    # 戦略は `one_for_one`でSlackとアクションのsupervisorを起動
    supervise(children, strategy: :one_for_one)
  end

end
  • MagicBot.Supervisorに管理されるSlackのコネクションを張り続けるモジュール

lib/magic_bot/bot.ex

defmodule MagicBot.Bot do

  use Slack

  def handle_connect(slack, state) do
    # Slackとの接続成功時に呼ばれるコールバック
    IO.puts "Connected as #{slack.me.name}"
    {:ok, state}
  end

  def handle_message(message = %{type: "message", text: _}, slack, state) do
    # Slackからメッセージを受け取った時に呼ばれるコールバック
    trigger = String.split(message.text, ~r{ | })
    
    case String.starts_with?(message.text, "<@#{slack.me.id}>: ") do
      # @bot名 ~ できたら :respond を渡してactionのプロセスを開始
      true -> BotAction.Supervisor.start_action(state[:sup_action], :respond, Enum.fetch!(trigger, 1), message, slack)
      # それ以外は :hear を渡して actionのプロセスを開始
      false -> BotAction.Supervisor.start_action(state[:sup_action], :hear, hd(trigger), message, slack)
    end
    {:ok, state}
  end

  def handle_message(_message, _slack, state) do
    {:ok, state}
  end
end
  • Botの行動を管理するSupervisor。

lib/bot_action/supervisor.ex

defmodule BotAction.Supervisor do

  def start_link(opts \\ []) do
    Task.Supervisor.start_link(opts)
  end

  def start_action(supervisor, command, trigger, message, slack) do
    # Slackのプロセスから呼ばれ、このSupervisor配下に新しいプロセスを作成する。
    # Task.Supervisorの子プロセスの戦略は `simple_one_for_one` になり、動的に追加できる。
    # クラッシュ時は再起動されない
    Task.Supervisor.start_child(supervisor, fn ->
      case command do
        :respond -> BotAction.Action.respond(trigger, message, slack)
        :hear -> BotAction.Action.hear(trigger, message, slack)
      end
    end)
  end

end
  • Botの行動を管理するモジュール。Botに何かさせたい時はこのモジュールに追加していく。

lib/bot_action/action.ex

defmodule BotAction.Action do

  def hear("lgtm", message, slack) do
    HTTPoison.start
    case URI.encode("http://www.lgtm.in/g") |> HTTPoison.get do
      {:ok, %HTTPoison.Response{status_code: 200, body: body}} -> body
        |> Floki.find("#imageUrl")
        |> Floki.attribute("value")
        |> hd
        |> send_message(message, slack)
      {_, _} -> nil
    end
  end

  def hear(_, _, _) do end

  def respond("エリクサーほしい?", message, slack) do
     send_message("エリクサーちょうだい!\nhttp://img.yaplog.jp/img/01/pc/2/5/2/25253/1/1354.jpg", message, slack)
  end

  def respond(_, _, _) do end

  defp send_message(text, message, slack) do
    Slack.send_message(text, message.channel, slack)
  end

end
  • これで完成。

意図した通りに動くか確認

  • lib/bot_action/action.exに以下の関数を追加してみる。
  def hear("test1", message, slack) do
    # 単純にメッセージを返す
    send_message("test1", message, slack)
  end

  def hear("test2", message, slack) do
    # 5秒待ってからメッセージを返す
    :timer.sleep(5000)
    send_message("test2", message, slack)
  end

  def hear("test3", message, slack) do
    # 意図的に例外を起こす
    raise "oops"
    send_message("test3", message, slack)
  end
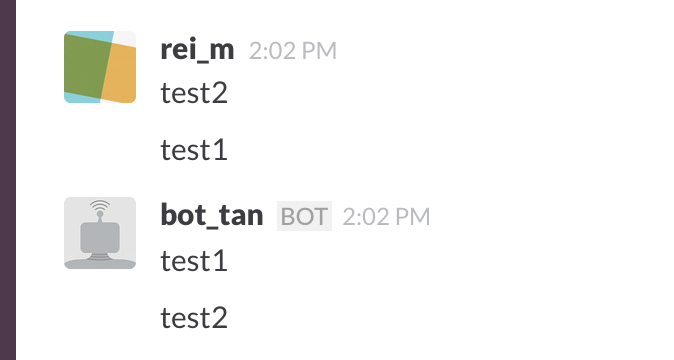
  • botを起動してSlackに"test2"を流したあとに"test1"を流す。

f:id:Rei19:20150921140421p:plain

  • test1はtest2のsleepに待たされることなく、即座にメッセージが返ってきたので、意図した通りに動いていてますね。

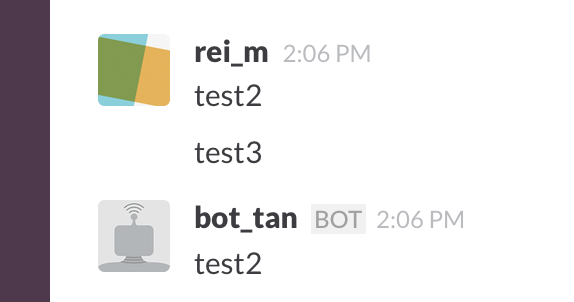
  • 次に"test2"を流したあとに"test3"を流して"test3"のプロセスをクラッシュさせてみます。

f:id:Rei19:20150921140720p:plain

  • test2はtest3のクラッシュの影響を受けずにメッセージを返していますね。test3のプロセスはメッセージを送る前にraiseしているのでメッセージは返ってきません。

  • という感じでOTPを使ってプロセス管理するとなかなかElixirっぽいコードになったかなという印象ですね。

Elixir 入門 ~ MIX AND OTP ~ その8 - Docs, tests and pipelines

  • TCP経由で受け取ったメッセージをパースしてKVアプリケーションに送る処理を実装する。

Doctests

  • doctestを使ってパースする関数を実装する。これはドキュメントからテストを作成することができ、ドキュメント内の正確なサンプルコードの提供を助けてくれる。lib/kv_server/command.exを新しく作ってみよう。
defmodule KVServer.Command do
  @doc ~S"""
  Parses the given `line` into a command.

  ## Examples

      iex> KVServer.Command.parse "CREATE shopping\r\n"
      {:ok, {:create, "shopping"}}

  """
  def parse(line) do
    :not_implemented
  end
end
  • doctestiex>のラインから始まる、スペース4文字分インデントが下がっているブロックのところで、コマンドと、その次の行にコマンドが返すであろう値を書く
  • doctestを走らせてみよう。新しくテスト用のtest/kv_server/command_test.exsを作成してmix testする。
defmodule KVServer.CommandTest do
  use ExUnit.Case, async: true
  doctest KVServer.Command
end
  • 実行すると以下のログが出て、doctestが実行されていることがわかる。
     test/kv_server/command_test.exs:3
     Doctest failed
     code: KVServer.Command.parse "CREATE shopping\r\n" === {:ok, {:create, "shopping"}}
     lhs:  :not_implemented
     stacktrace:
       lib/kv_server/command.ex:11: KVServer.Command (module)
  • ではparse/1を実装してテストが通るようにしよう。stlingを受け取ってパターンマッチで"CREATE"だったら返すようにする。直した上でテストを走らせる。今度は通るはず。
def parse(line) do
  case String.split(line) do
    ["CREATE", bucket] -> {:ok, {:create, bucket}}
  end
end
  • 他のテストも追加していこう。
    iex> KVServer.Command.parse "CREATE shopping\r\n"
    {:ok, {:create, "shopping"}}

    iex> KVServer.Command.parse "CREATE  shopping  \r\n"
    {:ok, {:create, "shopping"}}

    iex> KVServer.Command.parse "PUT shopping milk 1\r\n"
    {:ok, {:put, "shopping", "milk", "1"}}

    iex> KVServer.Command.parse "GET shopping milk\r\n"
    {:ok, {:get, "shopping", "milk"}}

    iex> KVServer.Command.parse "DELETE shopping eggs\r\n"
    {:ok, {:delete, "shopping", "eggs"}}

Unknown commands or commands with the wrong number of
arguments return an error:

    iex> KVServer.Command.parse "UNKNOWN shopping eggs\r\n"
    {:error, :unknown_command}

    iex> KVServer.Command.parse "GET shopping\r\n"
    {:error, :unknown_command}
  • そして実装も追加。
  def parse(line) do
    case String.split(line) do
      ["CREATE", bucket] -> {:ok, {:create, bucket}}
      ["GET", bucket, key] -> {:ok, {:get, bucket, key}}
      ["PUT", bucket, key, value] -> {:ok, {:put, bucket, key, value}}
      ["DELETE", bucket, key] -> {:ok, {:delete, bucket, key}}
      _ -> {:error, :unknown_command}
    end
  end

Pipelines

  • kv_server.exに作成したコマンドを組み込んでいこう。その前にcommand.exに以下の関数を追加する。
  @doc """
  Runs the given command.
  """
  def run(command) do
    {:ok, "OK\r\n"}
  end
  • そしてkv_server.exでクライアントからメッセージを受け取った際にコマンドを実行するようにする。
defp serve(socket) do
  # 受け取ったメッセージを元にコマンドを実行する
  msg =
    case read_line(socket) do
      {:ok, data} ->
        case KVServer.Command.parse(data) do
          {:ok, command} ->
            KVServer.Command.run(command)
          {:error, _} = err ->
            err
        end
      {:error, _} = err ->
        err
    end

  # コマンドの結果を出力
  write_line(socket, msg)
  serve(socket)
end

defp read_line(socket) do
  :gen_tcp.recv(socket, 0)
end

defp write_line(socket, msg) do
  :gen_tcp.send(socket, format_msg(msg))
end

defp format_msg({:ok, text}), do: text
defp format_msg({:error, :unknown_command}), do: "UNKNOWN COMMAND\r\n"
defp format_msg({:error, _}), do: "ERROR\r\n"
  • ここまでできたら再びmix run --no-haltでサーバーを起動してtelnetで接続しよう。CREATEコマンドを打ったらOKが、未定義のコマンドを打ったらUNKNOWN COMMANDが返ってくるはず
CREATE shopping
OK
HELLO
UNKNOWN COMMAND
  • ここで、ふたたびserveを見るとネストが深く見辛いコードになっているように感じる。できれば |> でつなげて書きたいが、コマンドが返す値は:okを含んだtupleかerrorを含んだtupleが返る可能性があるので返り値をうまくさばけない。{:ok, _}が返ってくる限り、値をパイプで私続けるような機能が欲しい。
  • elixir-pipesというモジュールがまさにあてはまる。mix.exsを開いて追加しよう。
def application do
  [applications: [:logger, :pipe, :kv],
   mod: {KVServer, []}]
end

defp deps do
  [{:kv, in_umbrella: true},
   {:pipe, github: "batate/elixir-pipes"}]
end
  • 保存したらmix deps.getして依存モジュールを取得しよう。そしてこれを使うことでserve/1は以下のように書き直すことができる。
defp serve(socket) do
  import Pipe

  # pipe_matching/3は x, {:ok, x} で {:ok, value} が与えられている間はvalueを次の関数に渡し続けるように命令している
  # マッチしない場合はマッチしなかった値を返す。
  msg =
    pipe_matching x, {:ok, x},
      read_line(socket)
      |> KVServer.Command.parse()
      |> KVServer.Command.run()

  write_line(socket, msg)
  serve(socket)
end

Running commands

  • 最後にKVServer.Command.run/1を実装してKVアプリケーションに命令を渡すようにしよう。
@doc """
Runs the given command.
"""
def run(command)

def run({:create, bucket}) do
  KV.Registry.create(KV.Registry, bucket)
  {:ok, "OK\r\n"}
end

def run({:get, bucket, key}) do
  lookup bucket, fn pid ->
    value = KV.Bucket.get(pid, key)
    {:ok, "#{value}\r\nOK\r\n"}
  end
end

def run({:put, bucket, key, value}) do
  lookup bucket, fn pid ->
    KV.Bucket.put(pid, key, value)
    {:ok, "OK\r\n"}
  end
end

def run({:delete, bucket, key}) do
  lookup bucket, fn pid ->
    KV.Bucket.delete(pid, key)
    {:ok, "OK\r\n"}
  end
end

defp lookup(bucket, callback) do
  case KV.Registry.lookup(KV.Registry, bucket) do
    {:ok, pid} -> callback.(pid)
    :error -> {:error, :not_found}
  end
end
  • 受け取った命令に応じてbucketを操作するように直した。lookupを見てみよう。bucketが見つからなかったら{:error, :not_found}を返すようにしているが、ユーザーに表示する場合もNot Foundであることを伝えるようにしたほうがよい。KV.Serverformat_msg/1 のパターンを追加する。
defp format_msg({:error, :not_found}), do: "NOT FOUND\r\n"
  • これでサーバーはほとんど完成した。最後にテストを追加しよう。
defmodule KVServerTest do
  use ExUnit.Case

  setup do
    Logger.remove_backend(:console)
    # KVアプリケーションを止めてstateをリセットした上で再開
    Application.stop(:kv)
    :ok = Application.start(:kv)
    Logger.add_backend(:console, flush: true)
    :ok
  end

  setup do
    # クライアントからの接続を作成
    opts = [:binary, packet: :line, active: false]
    {:ok, socket} = :gen_tcp.connect('localhost', 4040, opts)
    {:ok, socket: socket}
  end

  test "server interaction", %{socket: socket} do
    assert send_and_recv(socket, "UNKNOWN shopping\r\n") ==
           "UNKNOWN COMMAND\r\n"

    assert send_and_recv(socket, "GET shopping eggs\r\n") ==
           "NOT FOUND\r\n"

    assert send_and_recv(socket, "CREATE shopping\r\n") ==
           "OK\r\n"

    assert send_and_recv(socket, "PUT shopping eggs 3\r\n") ==
           "OK\r\n"

    # GET returns two lines
    assert send_and_recv(socket, "GET shopping eggs\r\n") == "3\r\n"
    assert send_and_recv(socket, "") == "OK\r\n"

    assert send_and_recv(socket, "DELETE shopping eggs\r\n") ==
           "OK\r\n"

    # GET returns two lines
    assert send_and_recv(socket, "GET shopping eggs\r\n") == "\r\n"
    assert send_and_recv(socket, "") == "OK\r\n"
  end

  defp send_and_recv(socket, command) do
    :ok = :gen_tcp.send(socket, command)
    {:ok, data} = :gen_tcp.recv(socket, 0, 1000)
    data
  end
end
  • mix testを走らせて通れば完成だ。

Elixir 入門 ~ MIX AND OTP ~ その7 - Task and gen-tcp

  • Erlang:gen_tcp モジュールについて学ぶ。

Echo server

  • まずはEcho Serverを作成することから始める。TCP Serverは以下のStepを実行する
  • 利用可能なPortを開いてListenする
  • そのPortでクライアントからの接続を待ち、受け入れる
  • クライアントからの要求を解析し、レスポンスを返す。
  • KVServerアプリケーションにこれらの機能を組み込んでみる。lib/kv_server.exを開いて以下のように編集する。
# 指定されたportでListenを開始する
def accept(port) do
  # The options below mean:
  #
  # 1. `:binary` - receives data as binaries (instead of lists)
  # 2. `packet: :line` - receives data line by line
  # 3. `active: false` - blocks on `:gen_tcp.recv/2` until data is available
  # 4. `reuseaddr: true` - allows us to reuse the address if the listener crashes
  #
  {:ok, socket} = :gen_tcp.listen(port,
                    [:binary, packet: :line, active: false, reuseaddr: true])
  IO.puts "Accepting connections on port #{port}"
  loop_acceptor(socket)
end

# socketを受け続けるループ。
defp loop_acceptor(socket) do
  {:ok, client} = :gen_tcp.accept(socket)
  serve(client)
  loop_acceptor(socket)
end

# socketを受け取っったときの処理
defp serve(socket) do
  socket
  |> read_line()
  |> write_line(socket)

  serve(socket)
end

# socketを読み込む
defp read_line(socket) do
  {:ok, data} = :gen_tcp.recv(socket, 0)
  data
end

# TCPを通してResponseを返す
defp write_line(line, socket) do
  :gen_tcp.send(socket, line)
end
  • iex -S mixからREPLの中でListenを開始してみる
iex> KVServer.accept(4040)
Accepting connections on port 4040
  • 開始されたらTerminalからtelnetでローカルホストの4040ポートに接続して、適当な文字を送ってみる
$ telnet 127.0.0.1 4040
Trying 127.0.0.1...
Connected to localhost.
Escape character is '^]'.
hello world !!
hello world !!
  • 送ったhello world !! がそのまま返されていることがわかる。
  • telnetの接続を終了させると以下のようなエラーがサーバー側に表示される。
iex(1)> KVServer.accept(4040)
Accepting connections on port 4040
** (MatchError) no match of right hand side value: {:error, :closed}
    (kv_server) lib/kv_server.ex:50: KVServer.read_line/1
    (kv_server) lib/kv_server.ex:43: KVServer.serve/1
    (kv_server) lib/kv_server.ex:37: KVServer.loop_acceptor/1
  • これは gen_tcp.recv/2でsocketを受け取ることを期待しているのに接続が閉じられたためで、その場合のハンドルが足りていない。そして、例外が発生したと同時にサーバーが終了して再起動しないことがわかる。これらを解決するためにはsupervision treeの元でプロセスを動かす必要があることに気づくだろう。

Tasks

  • Taskモジュールを使ってKVServerをsupervision treeの監督下の元で動かす。再びlib/kv_server.exを編集する。
def start(_type, _args) do
  import Supervisor.Spec

  children = [
    worker(Task, [KVServer, :accept, [4040]])
  ]

  opts = [strategy: :one_for_one, name: KVServer.Supervisor]
  Supervisor.start_link(children, opts)
end
  • これでサーバーはsupervision treeの一部となったのでmix run --no-haltでアプリケーションを動かしてみよう。--no-haltはアプリケーションのプロセスを止めないで起動するオプションである。
  • サーバーが立ち上がるはずなので同じくtelnetでローカルホストの4040ポートに接続してメッセージを送ってみる。問題なくメッセージは帰ってくるはずだ。
  • さきほどと同じようにtelnetを終了してみる。そうすると今度はエラーメッセージは表示されるが、サーバー自体は終了しない。これはone_for_one戦略に従いsupervisorが終了したサーバーのプロセスを再起動しているため。
  • では、別のターミナルで2個目のコネクションを張って同じくメッセージを送ってみる。すると接続はできるがレスポンスは返ってこない。今の作りでは接続中のクライアントがすでに存在していると新しいクライアントは受け入れられていないことがわかる。

Task supervisor

  • 複数のコネクションを処理するためにはコネクションを受け入れるプロセスとコネクションを処理するプロセスを分離する必要がある。
  • 再びstart/2を編集する。
  def start(_type, _args) do
    import Supervisor.Spec

    # TaskのSupervisorをsupervision treeに追加
    children = [
      supervisor(Task.Supervisor, [[name: KVServer.TaskSupervisor]]),
      worker(Task, [KVServer, :accept, [4040]])
    ]

    # See http://elixir-lang.org/docs/stable/elixir/Supervisor.html
    # for other strategies and supported options
    opts = [strategy: :one_for_one, name: KVServer.Supervisor]
    Supervisor.start_link(children, opts)
  end
  • TaskSupervisorsupervision treeの下に追加した。次にコネクションを処理するプロセスをTaskSupervisorの下に作るようにloop_acceptor/1を変更する。
defp loop_acceptor(socket) do
  {:ok, client} = :gen_tcp.accept(socket)
  {:ok, pid} = Task.Supervisor.start_child(KVServer.TaskSupervisor, fn -> serve(client) end)
  :ok = :gen_tcp.controlling_process(client, pid)
  loop_acceptor(socket)
end
  • :ok = :gen_tcp.controlling_process(client, pid)が追加された。これは子供のプロセスにクライアントからのソケットの"controlling process"を処理させる。これをしないとソケットはacceptするプロセスに縛られるため、クラッシュするとすべての子プロセスが死ぬ。
  • mix run --no-haltでサーバーを開始して複数のクライアントから接続できるようになっているのを確認しよう。また、複数接続した後でどれかのコネクションを終了させても他の接続は保たれているのも確認できる。